Imagine the rich, creamy goodness of fresh yogurt, customized to your taste, without any artificial additives. What if you could create this delicious, probiotic-rich staple right in your kitchen with minimal effort? With your trusty slow cooker, making homemade yogurt is not only possible but surprisingly simple and incredibly rewarding. Say goodbye to expensive store-bought tubs and hello to a world where you control every ingredient, ensuring a healthy and satisfying treat for your family. This guide will walk you through each step, helping you master the art of slow cooker yogurt and elevate your culinary experience.
The Magic Behind Slow Cooker Yogurt: What You Need to Know
Making yogurt at home involves a simple process of fermenting milk with beneficial bacteria. Your slow cooker provides the perfect environment for this transformation. It gently heats the milk to the ideal temperature for scalding and then, crucially, maintains a warm, consistent temperature during the incubation phase, allowing the live cultures to thrive and turn milk into creamy yogurt. This hands-off method is what makes the slow cooker an ideal tool for homemade yogurt, simplifying a process that might otherwise seem daunting.
The benefits of making your own yogurt are substantial. Beyond the undeniable cost savings, you gain complete control over the ingredients. No more worrying about added sugars, artificial flavors, or unnecessary thickeners. Homemade yogurt is packed with live and active probiotics, essential for gut health, and offers a versatile base for countless meals and snacks.
To embark on your yogurt-making journey, you’ll need a few essential pieces of equipment:
- Slow Cooker: Any standard slow cooker (4-7 quarts is ideal) will work. You don’t need a “yogurt” setting.
- Instant-Read Thermometer: Absolutely crucial for accurate temperature readings.
- Whisk: For thoroughly combining ingredients.
- Large Towels or Blanket: For insulation during incubation.
- Cheesecloth or Coffee Filters (Optional): For straining if you prefer thicker Greek-style yogurt.
- Airtight Containers: For storing your finished yogurt.
Your key ingredients are equally straightforward:
- Milk: Whole milk typically yields the creamiest, thickest yogurt, but 2% or skim milk can also be used for a lighter product. Avoid ultra-pasteurized milk, as its proteins are altered, making it difficult for the cultures to work effectively.
- Yogurt Starter Culture: This is where the magic begins! You need about 1/2 cup of plain yogurt with live and active cultures. Look for “Contains Live Active Cultures” on the label, specifically Lactobacillus bulgaricus and Streptococcus thermophilus. Once you’ve made your first batch, you can reserve a portion to use as a starter for future batches. Powdered starter cultures are also an option.
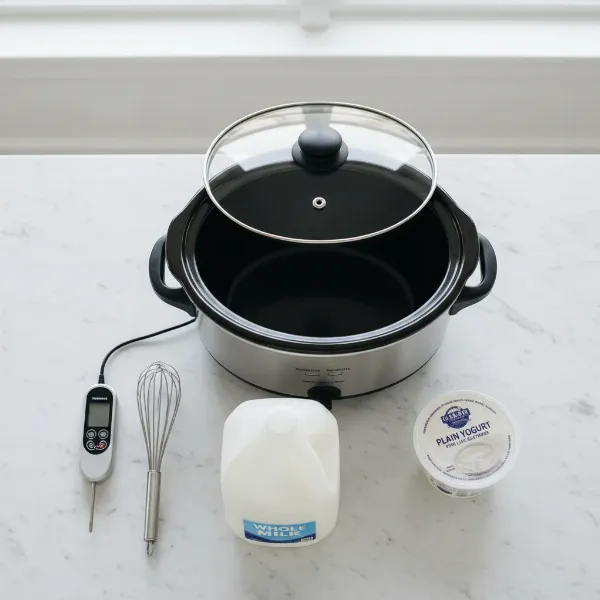 essential slow cooker yogurt making equipment and ingredients ready on a kitchen counter
Step-by-Step Guide to Making Yogurt in Your Slow Cooker
Crafting your own slow cooker yogurt is a multi-stage process, but each step is straightforward. Follow these instructions carefully for the best results.
Step 1: Heat the Milk
|
Our Picks for the Best Slow cooker in 2026
As an Amazon Associate I earn from qualifying purchases.
|
||
| Num | Product | Action |
|---|---|---|
| 1 | Ninja® 12-in-1 PossibleCooker™ PLUS - 8.5-qt - Sous Vide & Proof Multi-Cooker - Slow Cooker, Dutch Oven & More - Glass Lid & Integrated Spoon - Nonstick - Oven Safe Pot to 500°F - Black - MC1010 |

|
| 2 | Crock-Pot Large 8-Quart Programmable Slow Cooker with Auto Warm Setting Black Stainless Steel |
|
| 3 | Crock-Pot 6 Quart Programmable Slow Cooker with Timer and Auto Food Warmer Setting, Stainless Steel |
|
| 4 | Crock-Pot 6 Quart Cook & Carry Programmable Slow Cooker with Digital Timer Stainless Steel (CPSCVC60LL-S) pack of 1 |
|
| 5 | Ninja MC1001 Foodi PossibleCooker PRO 8.5 Quart Multi-Cooker, with 8-in-1 Slow Cooker, Dutch Oven, Steamer, Glass Lid Integrated Spoon, Nonstick, Oven Safe Pot to 500°F, Sea Salt Gray |
|
| 6 | Slow Cooker 10-Quart - PFOA-Free Ceramic Coating, Oven Safe to 450°F - Keep Warm Function for Large Family Gatherings (Includes Silicone Spoon) |
|
| 7 | Ninja MC1101 Foodi Everyday Possible Cooker Pro, 8-in-1 Versatility, One-Pot Faster Cooking Replaces 10 Tools, Family-Sized Capacity with Adjustable Temp Control, 6.5 quarts, Midnight Blue |
|
| 8 | Hamilton Beach 6-Quart Slow Cooker with 3 Cooking Settings, Dishwasher-Safe Stoneware Crock & Glass Lid, Silver (33665G) |
|
| 9 | Hamilton Beach Slow Cooker, Extra Large 10 Quart, Stay or Go Portable With Lid Lock, Dishwasher Safe Crock, Black (33195) |
|
| 10 | Crock-Pot 7 Quart Oval Manual Slow Cooker, Stainless Steel (SCV700-S-BR), Versatile Cookware for Large Families or Entertaining |
|
Pour 1/2 to 1 gallon of milk into your slow cooker. Place the lid on and turn your slow cooker to the LOW setting. Heat the milk for approximately 2.5 to 3 hours, or until it reaches a temperature of 180°F (82°C). This scalding process denatures the milk proteins, which helps create a thicker yogurt and eliminates any unwanted bacteria. Use your instant-read thermometer to check the temperature periodically. Some slow cookers may heat faster, so keep a close eye on it.
Step 2: Cool Down the Milk
Once the milk reaches 180°F, turn off and unplug the slow cooker. Leave the lid on and allow the milk to cool naturally. This cooling phase is critical. The milk needs to come down to a temperature range between 110°F and 115°F (43°C-46°C). This usually takes about 2 to 3 hours, but again, use your thermometer to confirm. If the milk is too hot, it will kill the delicate live cultures you’re about to add. If it’s too cool, the cultures won’t activate properly, resulting in runny yogurt.
Step 3: Introduce the Starter Culture
While the milk is cooling, take your 1/2 cup of plain yogurt starter (or activate your powdered starter according to its package directions) out of the refrigerator and let it come to room temperature. This helps prevent shocking the cultures when they’re introduced to the warm milk. Once your milk in the slow cooker is within the 110°F-115°F range, scoop out about 1-2 cups of the warm milk into a separate bowl. Whisk the room-temperature starter yogurt into this smaller amount of milk until it’s fully combined and smooth. This step, often called tempering, helps to evenly distribute the cultures. Then, pour this starter-milk mixture back into the slow cooker with the rest of the milk and whisk gently but thoroughly to ensure the cultures are dispersed throughout.
Step 4: The Incubation Period
Replace the lid on your slow cooker. For optimal incubation, wrap the entire slow cooker (with the lid on) in one or two thick bath towels or a blanket. This creates an insulated, warm, and dark environment crucial for the beneficial bacteria to ferment the milk. Some people place the wrapped slow cooker in an oven with just the oven light on (oven off) to maintain a consistent warm temperature. Let the yogurt incubate undisturbed for 8 to 12 hours, or even overnight. The longer it incubates, the tangier and often thicker your yogurt will be. Avoid peeking during this time, as opening the lid can disrupt the temperature and the culturing process.
Step 5: Chill and Enjoy (Optional: Strain for Greek Yogurt)
After the incubation period, your yogurt is ready! It will appear somewhat set and may have a layer of clear or yellowish liquid on top, known as whey. Carefully remove the lid and towels. Spoon the yogurt into airtight containers and refrigerate for at least 4-6 hours. Chilling helps the yogurt thicken further and firms up its consistency.
If you prefer a thicker, Greek-style yogurt, you’ll need to strain it. Line a colander or a fine-mesh strainer with a few layers of cheesecloth or several coffee filters. Place this setup over a large bowl, ensuring there’s space for the whey to collect without touching the bottom of the strainer. Pour the freshly made yogurt into the lined colander. Cover gently and refrigerate while it strains. The longer you let it strain (from 1 to several hours), the thicker your yogurt will become. The collected whey can be used in smoothies, baking, or as a nutritional boost in other recipes.
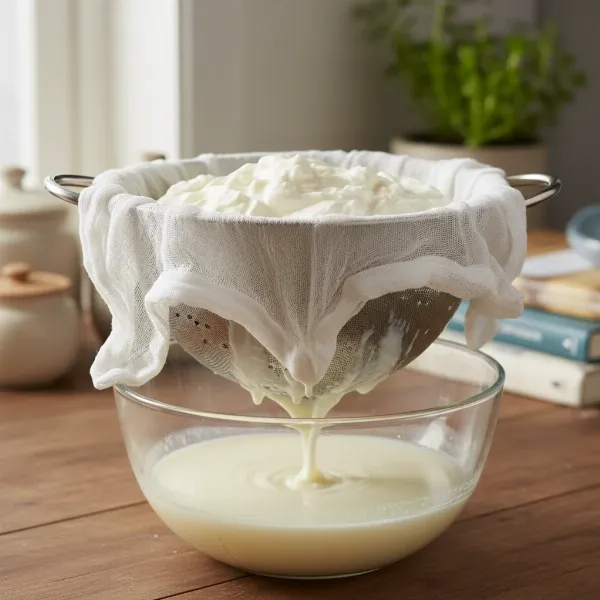 freshly made slow cooker yogurt being strained to create Greek style
Tips for Perfect Slow Cooker Yogurt Every Time
Achieving consistent, delicious homemade yogurt is within reach. A few simple tips can make all the difference.
Temperature Precision is Key
The most critical factor in successful yogurt making is maintaining precise temperatures. An accurate instant-read thermometer is your best friend. Ensure the milk reaches 180°F (82°C) during heating and cools to between 110°F and 115°F (43°C-46°C) before adding the starter. Going above 120°F (49°C) during inoculation can kill the live cultures, while temperatures below 100°F (38°C) will slow or halt fermentation, resulting in thin yogurt.
Choosing the Right Milk and Starter
For the creamiest, most robust yogurt, opt for whole milk. Its higher fat content contributes to a richer texture. While 2% milk can work, skim milk will yield a thinner result. Always avoid ultra-pasteurized (UHT) milk as its proteins are altered, inhibiting proper culture development. When selecting your starter, always confirm it contains “live and active cultures.” Freshness matters, so use a starter from a recently opened container. You can also incorporate 1-2 tablespoons of powdered milk during the heating phase to increase milk solids, which can contribute to a thicker yogurt.
Ensuring a Stable Incubation Environment
A consistent, warm, and dark environment is paramount for the cultures to do their work. Wrapping your slow cooker in towels or a blanket helps maintain the ideal temperature during the 8-12 hour incubation period. If your kitchen tends to be cool, consider placing the wrapped slow cooker in an oven with only the oven light on. The minimal heat from the light can provide just enough warmth without overheating. Avoid disturbing the slow cooker during incubation to prevent disrupting the delicate setting process.
Flavoring Your Homemade Yogurt
The beauty of homemade yogurt is the ability to customize its flavor. While plain yogurt is incredibly versatile, you can easily add sweetness or flavor after the yogurt has chilled. Stir in honey, maple syrup, fruit preserves, or fresh fruit. For vanilla yogurt, add a teaspoon of pure vanilla extract per gallon of milk after the cooling phase but before the incubation. Experiment with different spices like cinnamon or a dash of cardamom for unique twists.
Troubleshooting Common Slow Cooker Yogurt Issues
Even experienced home cooks can encounter hiccups. Here are solutions to common problems you might face when making slow cooker yogurt.
Why is My Yogurt Runny?
If your slow cooker yogurt turns out thin or watery, several factors could be at play:
- Incorrect Temperature: This is the most common culprit. If the milk was too hot when you added the starter, the cultures died. If it was too cold, they didn’t activate. Precision with your thermometer is key.
- Inactive Starter: Your starter yogurt might not have had enough live cultures, or it might have been old. Always check the expiration date and ensure the label states “live and active cultures.”
- Ultra-Pasteurized Milk: As mentioned, this type of milk often struggles to ferment properly. Stick to regular pasteurized milk.
- Insufficient Incubation Time: The cultures need time to work their magic. Extending the incubation period by a few hours can sometimes help thicken a runny batch.
- Disturbance During Incubation: Opening the lid or moving the slow cooker can drop the temperature, hindering the cultures.
Too Tangy or Not Tangy Enough?
The tanginess of your yogurt is directly related to the incubation time.
- Too Tangy: If your yogurt is too sour for your liking, reduce the incubation time in your next batch. Shorter incubation periods (e.g., 8-10 hours) result in a milder flavor.
- Not Tangy Enough: For a more pronounced tang, let your yogurt incubate longer, up to 12-14 hours. The bacteria produce more lactic acid over time, increasing the tartness.
Dealing with Whey
The clear liquid that separates from your yogurt is whey, a natural byproduct of fermentation. It’s perfectly normal and rich in nutrients.
- Excessive Whey: If you have a lot of whey, your yogurt might be slightly over-incubated, or you might prefer a thicker consistency. Strain the yogurt using cheesecloth to remove excess whey and achieve a Greek-style texture.
- Using Whey: Don’t discard it! Whey can be a fantastic addition to smoothies, used in baking as a liquid, or even as a starter for fermenting vegetables.
Homemade Slow Cooker Yogurt vs. Store-Bought: Benefits & Savings
Deciding between homemade and store-bought yogurt often comes down to health, taste, and budget. When you make yogurt in your slow cooker, you take control of all three. A gallon of milk and a small container of starter can yield a gallon of fresh yogurt for a fraction of the cost of premium store-bought varieties, especially organic or Greek options. This translates to significant savings over time for yogurt-loving households. Beyond the economic advantage, homemade yogurt offers a purity that’s hard to find commercially. You avoid added sugars, artificial flavors, stabilizers, and thickeners, ensuring a cleaner, healthier product. The taste is often superior too – fresh, vibrant, and exactly to your preference, whether you like it plain, subtly sweet, or intensely tangy. It’s a fundamental step towards a more self-sufficient and health-conscious kitchen.
“Making yogurt at home is one of the simplest yet most impactful changes you can make for your diet and your wallet. The control over ingredients and the fresh taste are unmatched.” – The Crockpotz Admin, Slow Cooker Expert
Conclusion
Embarking on the journey of making homemade yogurt in your slow cooker is a rewarding experience that offers numerous benefits, from significant cost savings to complete control over ingredients. By following these clear, step-by-step instructions and keeping a keen eye on temperature, you can consistently produce creamy, delicious, and probiotic-rich yogurt right in your own kitchen. This simple process allows you to enjoy a healthier, more customized dairy staple, moving you closer to a more self-sufficient lifestyle. Are you ready to discover the ease and satisfaction of homemade yogurt?
Frequently Asked Questions
How long does homemade slow cooker yogurt last?
Homemade slow cooker yogurt, when stored in an airtight container in the refrigerator, typically lasts for about 1 to 2 weeks. The exact duration can vary based on your kitchen’s hygiene during preparation and how well it’s sealed, but consuming it within 10-14 days is generally recommended for optimal freshness and quality.
Can I use ultra-pasteurized milk for slow cooker yogurt?
It is generally not recommended to use ultra-pasteurized (UHT) milk for making yogurt in a slow cooker. The intense heat treatment of UHT milk alters its proteins, which can prevent the milk from setting properly and inhibit the live cultures from fermenting effectively, often resulting in a very thin or failed batch of yogurt.
What’s the best milk for thick yogurt?
Whole milk is widely considered the best choice for making thick and creamy homemade yogurt in a slow cooker. Its higher fat content contributes significantly to the richness and luxurious texture of the final product. While 2% milk can be used, it will yield a slightly less thick consistency.
How much starter do I need for slow cooker yogurt?
For a batch of yogurt using 1/2 to 1 gallon of milk in a slow cooker, you typically need about 1/2 cup of plain yogurt with live and active cultures as your starter. Ensure the starter is at room temperature before whisking it into the cooled milk to promote optimal fermentation.
Do I need a special slow cooker with a “yogurt” setting?
No, you do not need a special slow cooker with a “yogurt” setting to make homemade yogurt. Any standard slow cooker (4-7 quarts) will work effectively. The key steps involve manually heating the milk and then providing a warm, insulated environment for incubation, which can be achieved with towels or by using your oven light.