Imagine a deeply nourishing, flavorful liquid brimming with health-boosting compounds, effortlessly simmering to perfection while you go about your day. That’s the magic of homemade bone broth, and your slow cooker is the ultimate tool for crafting this ancient elixir. This comprehensive guide will walk you through creating a rich, gelatinous bone broth in your slow cooker, meticulously simmered for 24 hours to extract maximum nutrients and flavor. Prepare to transform simple ingredients into a foundational staple for better health and delicious meals.
Understanding Bone Broth: The Elixir of Health
Bone broth is a savory liquid made by simmering animal bones and connective tissues for an extended period, typically 12-48 hours. This slow cooking process extracts valuable compounds that offer a myriad of health benefits. Unlike regular stock, which is often cooked for a shorter duration and primarily for culinary flavor, bone broth focuses on maximizing nutrient extraction.
Making bone broth in a slow cooker is particularly advantageous for its gentle, consistent heat. This low and slow method allows for an optimal, steady extraction of nutrients without the risk of scorching or aggressive boiling, which can lead to a cloudy or less potent broth. It’s a hands-off approach that fits seamlessly into a busy lifestyle, transforming overlooked ingredients into a powerful wellness drink.
The benefits of bone broth are vast, primarily due to its rich content of collagen, gelatin, and a spectrum of essential minerals. As bones simmer for 24 hours, they release collagen, which converts into gelatin, known for supporting gut health by helping to seal and repair the gut lining. This gelatin also contributes to healthier skin, hair, and nails by providing amino acids crucial for connective tissue repair and elasticity. Furthermore, bone broth is packed with minerals like calcium, magnesium, phosphorus, sulfur, and potassium, alongside beneficial amino acids such as glycine, proline, and glutamine, which support joint health, immune function, and detoxification pathways.
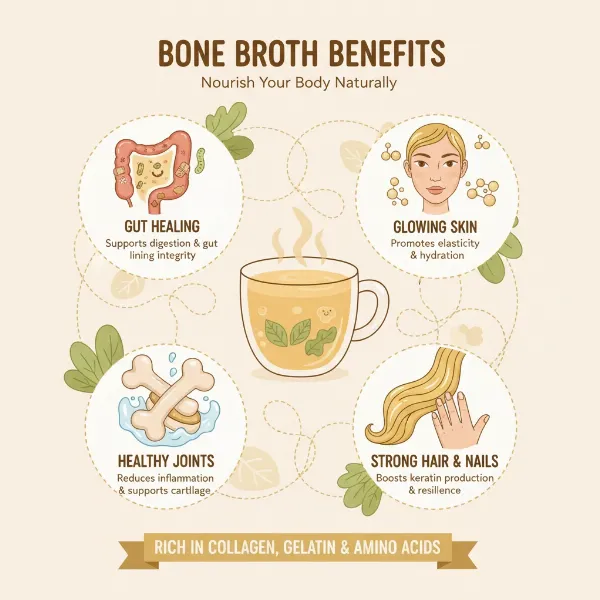 Visual representation of bone broth benefits for gut, skin, hair, nails, and joints.
The Essential Ingredients for a Rich Bone Broth
Crafting an exceptional bone broth begins with selecting the right foundation. Each component plays a vital role in developing a deeply nutritious and flavorful liquid.
Choosing the Right Bones
The quality and type of bones you use significantly impact your broth’s flavor and nutrient density. For a truly potent bone broth, aim for a variety of bones, especially those rich in collagen and marrow.
- Beef Bones: Marrow bones, knuckle bones, oxtail, and joint bones are excellent choices. Roasting them beforehand adds incredible depth of flavor.
- Chicken Bones: Whole chicken carcasses (from a roasted chicken are perfect), chicken feet (a secret for gelatinous broth), necks, and wing tips.
- Other Options: Turkey or even fish bones (for a lighter, quicker broth) can also be used.
|
Our Picks for the Best Slow cooker in 2026
As an Amazon Associate I earn from qualifying purchases.
|
||
| Num | Product | Action |
|---|---|---|
| 1 | Hamilton Beach Slow Cooker, Extra Large 10 Quart, Stay or Go Portable With Lid Lock, Dishwasher Safe Crock, Black (33195) |

|
| 2 | Ninja MC1001 Foodi PossibleCooker PRO 8.5 Quart Multi-Cooker, with 8-in-1 Slow Cooker, Dutch Oven, Steamer, Glass Lid Integrated Spoon, Nonstick, Oven Safe Pot to 500°F, Sea Salt Gray |
|
| 3 | Ninja MC1101 Foodi Everyday Possible Cooker Pro, 8-in-1 Versatility, One-Pot Faster Cooking Replaces 10 Tools, Family-Sized Capacity with Adjustable Temp Control, 6.5 quarts, Midnight Blue |
|
| 4 | Crock-Pot 6 Quart Cook & Carry Programmable Slow Cooker with Digital Timer Stainless Steel (CPSCVC60LL-S) pack of 1 |
|
| 5 | Hamilton Beach 6-Quart Slow Cooker with 3 Cooking Settings, Dishwasher-Safe Stoneware Crock & Glass Lid, Silver (33665G) |
|
| 6 | Crock-Pot Large 8-Quart Programmable Slow Cooker with Auto Warm Setting Black Stainless Steel |
|
| 7 | Ninja® 12-in-1 PossibleCooker™ PLUS - 8.5-qt - Sous Vide & Proof Multi-Cooker - Slow Cooker, Dutch Oven & More - Glass Lid & Integrated Spoon - Nonstick - Oven Safe Pot to 500°F - Black - MC1010 |
|
| 8 | Crock-Pot 6 Quart Programmable Slow Cooker with Timer and Auto Food Warmer Setting, Stainless Steel |
|
| 9 | Crock-Pot 7 Quart Oval Manual Slow Cooker, Stainless Steel (SCV700-S-BR), Versatile Cookware for Large Families or Entertaining |
|
| 10 | Slow Cooker 10-Quart - PFOA-Free Ceramic Coating, Oven Safe to 450°F - Keep Warm Function for Large Family Gatherings (Includes Silicone Spoon) |
|
Mixing bone types can yield a more complex flavor profile. Aim for 2-4 pounds of bones for a standard 6-8 quart slow cooker.
The Acidic Helper
A small amount of an acidic element, like apple cider vinegar, is crucial. It helps to break down the collagen and connective tissues, facilitating the leaching of minerals from the bones into the broth. Use 1-2 tablespoons of raw, unfiltered apple cider vinegar per batch. While apple cider vinegar is most common, a squeeze of lemon juice can also work as an alternative. Don’t worry, the vinegar taste will not be prominent in the final broth.
Aromatics and Vegetables
These ingredients enhance the flavor of your bone broth, adding subtle sweetness, savory notes, and additional nutrients.
- Standard Trio: Onions (halved or quartered), carrots (chopped into large pieces), and celery (cut into large stalks).
- Flavor Boosters: Several cloves of garlic (smashed), bay leaves, whole black peppercorns, and fresh herbs like thyme or rosemary sprigs.
- Optional: Leeks, parsley stems, or ginger for added zest.
Some purists prefer to add vegetables only for the last few hours of cooking, or not at all, to maintain a pure bone flavor and prevent the broth from becoming too “vegetable-like” or slightly bitter if overcooked. For a 24-hour simmer, adding them at the start is generally fine, but ensure they are in large chunks.
Water and Seasoning
Filtered water is ideal for the purest taste. You’ll need enough water to cover all your bones and aromatics, leaving about 1-2 inches of headspace in your slow cooker to prevent boiling over. As for seasoning, a pinch of sea salt can be added at the beginning, but it’s often best to season the broth to taste after it has finished cooking and been strained, as its flavor will concentrate.
Step-by-Step: Crafting Your 24-Hour Slow Cooker Bone Broth
Creating a deeply nourishing bone broth is surprisingly simple, especially with the “set it and forget it” convenience of a slow cooker. Follow these steps for a perfect 24-hour simmer.
Prepping Your Bones for Maximum Flavor
While optional, roasting your bones before adding them to the slow cooker can significantly deepen the flavor of your broth, giving it a rich, caramelized note. This step is highly recommended for beef or larger poultry bones.
- Roast: Preheat your oven to 400°F (200°C). Spread your bones (beef, chicken, or a mix) on a baking sheet. Roast for 30-45 minutes, turning halfway, until they are nicely browned.
- Deglaze (Optional): If roasting, you might find flavorful bits stuck to the pan. You can deglaze the pan with a little water or broth on the stovetop and add this liquid to your slow cooker for extra richness.
Assembling Your Slow Cooker
With your bones prepped, it’s time to gather all your ingredients in the slow cooker pot.
- Bones First: Place the roasted or raw bones into the slow cooker. They should fill roughly half to three-quarters of the pot.
- Add Aromatics: Scatter your chopped vegetables, garlic, bay leaves, peppercorns, and fresh herbs around and over the bones.
- Pour Liquid: Add the apple cider vinegar. Then, pour in enough filtered water to completely cover all the ingredients, ensuring you leave at least 1-2 inches of space from the rim of the pot to prevent overflow during simmering.
The 24-Hour Simmer: Settings for Success
This is where the slow cooker truly shines, allowing for a long, gentle extraction without constant monitoring.
- Set and Forget: Secure the lid on your slow cooker. Set the temperature to LOW. This is crucial for a gentle simmer, which is ideal for extracting collagen and minerals. Avoid the “High” setting, as it can cause the broth to boil too vigorously, potentially leading to cloudiness and a less desirable flavor.
- The 24-Hour Cycle: Allow your bone broth to simmer on the LOW setting for a full 24 hours. This extended cooking time is optimal for breaking down the bones and connective tissues, releasing maximum nutrients and gelatin. You’ll know it’s ready when the bones appear softer and crumble easily. It is safe to leave your slow cooker on low overnight, but ensure it’s placed on a stable surface away from other kitchen items.
Skimming and Straining for Clarity
Once the 24-hour simmer is complete, it’s time to transform the murky contents into a clear, golden broth.
- Initial Skim: Carefully remove the lid. You may notice a layer of foam or scum on the surface; gently skim this off with a spoon.
- Rough Strain: Using tongs or a slotted spoon, carefully remove all the bones and large vegetable pieces from the slow cooker and discard them.
- Fine Strain: Place a fine-mesh strainer over a large bowl or another pot. For an even clearer broth, line the strainer with cheesecloth. Slowly ladle the broth through the strainer to remove any remaining small particles and sediment.
Cooling and Storing Your Homemade Bone Broth
Proper cooling and storage are essential for safety and to preserve the quality of your homemade bone broth.
- Cooling: Allow the strained broth to cool down on the counter for 1-2 hours. To speed up the cooling process and prevent bacterial growth, you can place the pot in an ice bath. Once it has cooled significantly but is still warm, transfer it to the refrigerator, uncovered, until completely chilled (several hours or overnight).
- De-Fatting (Optional): After chilling, a solid layer of fat will typically form on top. This fat acts as a protective seal. You can either leave it, especially if you plan to consume the broth quickly, or easily scrape it off with a spoon and discard it if you prefer a leaner broth.
- Storage: Ladle the cooled bone broth into airtight containers, glass jars, or freezer-safe bags.
- Refrigerator: Stores well for up to 5-7 days.
- Freezer: For longer storage, freeze in individual portions (ice cube trays are great for this) for several months.
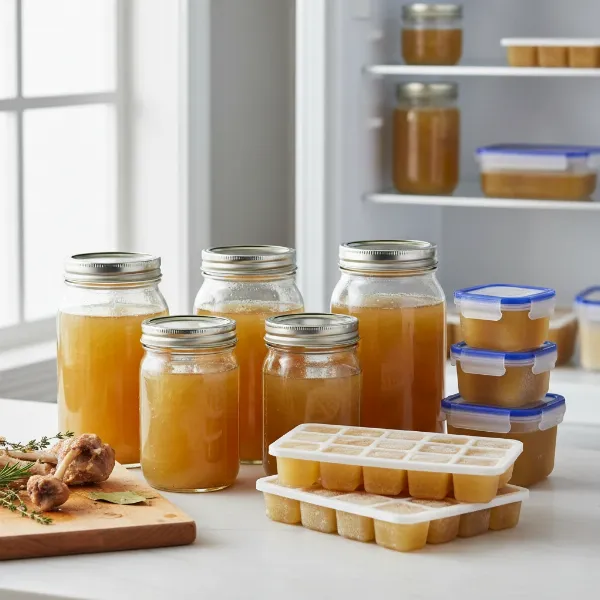 Assortment of homemade bone broth stored in glass jars and ice cube trays.
Troubleshooting Common Bone Broth Challenges
Even seasoned cooks can encounter a few hiccups when making bone broth. Here are some common issues and how to resolve them, ensuring your 24-hour slow cooker bone broth is a success.
Why Isn’t My Broth Gelling?
A hallmark of a nutrient-dense bone broth is its gelatinous texture when chilled. If your broth remains liquid after cooling, it usually means:
- Insufficient Collagenous Bones: You might not have used enough bones rich in collagen (like knuckle bones, chicken feet, or oxtail).
- Too Much Water: The ratio of bones to water was off, diluting the collagen.
- Not Enough Cooking Time: While 24 hours is optimal, if your slow cooker runs a bit cooler, you might need a few more hours for maximum extraction. Ensure it’s on a consistent LOW setting.
My Broth Tastes Bland.
A bland broth can be disappointing, but it’s often an easy fix for future batches:
- Unroasted Bones: Roasting bones dramatically deepens their flavor.
- Lack of Variety: Using only one type of bone or insufficient bones can result in a weaker flavor.
- Too Much Water: Over-diluting the broth can lead to a watery taste.
- Missing Aromatics/Seasoning: Ensure you’re adding enough onions, carrots, celery, garlic, bay leaves, and peppercorns. Adjust salt at the end.
Bitterness or Odd Flavor.
While the 24-hour simmer is key, there’s a fine line where flavors can turn if ingredients are left too long:
- Overcooking Vegetables: Simmering vegetables for extremely long periods (especially beyond 24-36 hours) can sometimes impart a “stewed” or slightly bitter flavor. Some cooks add vegetables only for the last few hours, or even omit them.
- Burnt Bits: Ensure nothing is stuck to the bottom of the slow cooker that could scorch, although this is rare on a low setting.
- Old Ingredients: Always use fresh bones and vegetables for the best flavor.
Dealing with Cloudiness.
A cloudy broth is purely aesthetic and doesn’t affect taste or nutrition, but for a clear presentation:
- Aggressive Boiling: A rolling boil causes impurities to emulsify into the liquid. The slow cooker’s low setting generally prevents this, but ensure it’s not simmering too vigorously.
- Not Skimming Scum: Initial scum that rises to the surface contains impurities. Skimming it off gently in the first few hours helps.
- Improper Straining: Not using a fine-mesh strainer or cheesecloth can leave small particles in the broth.
Maximizing the Benefits: Enjoying Your Homemade Elixir
Once you’ve made your batch of 24-hour slow cooker bone broth, the possibilities are endless for incorporating this nutritional powerhouse into your daily routine.
A Nourishing Drink
The simplest and perhaps most direct way to enjoy bone broth is to drink it warm, like a comforting tea. Many people make it a morning ritual, replacing coffee or simply enjoying a mug between meals. You can add a pinch of salt, a squeeze of lemon, or even a dash of fresh ginger for an extra boost. It’s especially soothing during cold weather or when feeling under the weather.
Culinary Powerhouse
Beyond a comforting drink, bone broth is an incredible culinary ingredient that can elevate the flavor and nutritional value of countless dishes.
- Soups and Stews: Use it as the base for any soup, stew, or chili. Its rich flavor will deepen the complexity of your dishes.
- Sauces and Gravies: Incorporate bone broth into pan sauces, gravies, or reductions for an umami-rich foundation.
- Cooking Grains: Replace water with bone broth when cooking rice, quinoa, couscous, or pasta for added flavor and nutrients.
- Braising Meats: Use bone broth as the liquid for braising tougher cuts of meat; the collagen will break down, tenderizing the meat and creating a delicious sauce.
- Roasting Vegetables: Toss vegetables with a little bone broth before roasting for extra flavor.
Slow Cooker: The Ultimate Tool for Bone Broth
While there are other methods for making bone broth, the slow cooker stands out as the superior choice, particularly for a 24-hour simmer. Its unique features make it ideal for extracting the maximum goodness from bones with minimal effort.
Unmatched Convenience
The primary advantage of the slow cooker is its “set it and forget it” nature. Once you’ve loaded your ingredients, you can confidently leave it to simmer for 24 hours without constant supervision. This means you can start a batch before work, let it cook overnight, or simply enjoy a day out while your broth slowly develops its rich flavor and nutrients. It eliminates the need to constantly monitor stove-top temperatures or worry about pots boiling over.
Consistent, Gentle Extraction
A slow cooker maintains a consistent, low temperature throughout the cooking process. This gentle heat is crucial for bone broth, as it slowly breaks down collagen into gelatin and coaxes minerals from the bones without denaturing sensitive nutrients. A vigorous boil, often seen on a stovetop, can emulsify fats and impurities, leading to a cloudy broth, and may even degrade some beneficial compounds. The slow cooker ensures a steady, optimal environment for nutrient release.
Safety and Minimal Evaporation
Cooking bone broth for 24 hours on a stovetop can be a safety concern, requiring constant attention and posing a fire risk. A slow cooker, designed for extended, unattended cooking, is a much safer option. Its tightly sealed lid also significantly reduces liquid evaporation. This means you won’t need to constantly top up the water, ensuring your final yield is consistent and concentrated, extracting all the goodness without unnecessary water loss.
Conclusion
Making your own bone broth in a slow cooker for a full 24 hours is a rewarding and incredibly beneficial culinary endeavor. It’s a testament to how simple, traditional methods can yield profound health benefits, transforming humble bones and vegetables into a nutrient-dense elixir. By embracing the “set it and forget it” simplicity of a slow cooker, you unlock a world of convenience, ensuring a consistent, gentle extraction of collagen, gelatin, and vital minerals. This homemade liquid gold will not only enrich your meals with unparalleled flavor but also support your gut health, joints, skin, and immune system. So, gather your bones, load your slow cooker, and let time work its magic. What nourishing meals will you create with your freshly simmered bone broth?
Frequently Asked Questions
How long can slow cooker bone broth last?
Properly stored homemade bone broth can last in the refrigerator for 5 to 7 days. For longer preservation, it freezes exceptionally well for several months, making it easy to prepare large batches and store for future use.
Can I reuse bones for bone broth?
While some people attempt a second batch of broth with the same bones, the majority of the nutrients and collagen are extracted during the first 24-hour simmer. A second use will typically yield a much weaker broth in terms of both flavor and nutrient density.
What’s the best slow cooker size for bone broth?
A 6-quart or 8-quart slow cooker is generally recommended for making bone broth. This size allows enough space for a substantial amount of bones and water, ensuring a good yield of concentrated broth without overcrowding the pot.
Is 24 hours really necessary, or is it too long?
A 24-hour simmer on a low setting is widely considered optimal for extracting the maximum amount of collagen, gelatin, and minerals from the bones. While some recipes suggest shorter times, 24 hours ensures a potent, nutrient-rich broth. Going much beyond 36 hours, however, can sometimes lead to a slightly bitter taste.
Why do I add apple cider vinegar to bone broth?
Apple cider vinegar serves a crucial purpose: its acidity helps to break down the tough connective tissues and leach valuable minerals, such as calcium and magnesium, from the bones into the broth. Don’t worry, the finished broth will not taste acidic.